Pixel Guide
Terminology
Here below, are all the terms that will be used in this pixel guide. If you don’t recognize any words beyond this section, please refer to this part of the guide.
Endless Online - If you don’t know what Endless is, please leave right now.
Pixels - A single dot of light on the computer screen; the smallest unit of a computer graphic, the building blocks to a sprite. The word derives from “picture element.”
Sprites - A two-dimensional/three-dimensional image or animation that is integrated into a larger scene.
ResHacker - The program used to open the GFX files in Endless-Online.
GFX - An acronym for “graphics effects.” Referring to the characters, clothes, and other miscellaneous items in Endless-Online.
NPC - An acronym for “non playable character.”
Line Art/Outline - a line that shows or created the outer edges of a shape or form. It may also be called a contour.
Shading - Showing the contrast between the areas of light and dark.
Pillow Shading - Something you should avoid doing. Pillow shading is shading in from the outlines, without regard for a light source. This makes your sprite look flat, with a stained-glass appearance, as it's the lines casting shadows, and not the 3D shape.
Banding - Definition pending.
Dithering - The process of averaging between pixels of different colors. This results in a smoother, blended transition between the edge of two areas. Also doubles as a way to add texture to an object
Step 1 - Getting your sprite/s.

This step is really easy, especially because there's already sprites on the internet or on EO.
If you have a hard time finding any, use ResHacker. ResHacker is a really useful tool used to view the GFX files located in the Endless-Online folder. If ResHacker isn’t your thing, Reuben also has sprite sheets that can be used for this as well:
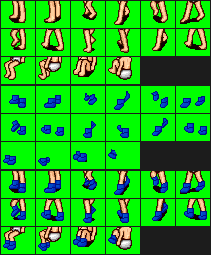
Shoes http://i578.photobucket.com/albums/ss230/dragonnking/M-1.png?t=1246026498
Armor M http://i578.photobucket.com/albums/ss230/dragonnking/M.png?t=1246026302
Armor F http://i32.tinypic.com/nb7qcp.png
Helmet M+F http://i578.photobucket.com/albums/ss230/dragonnking/MF.png?t=1246027115
Weapons http://i31.tinypic.com/312iipg.png
Shield http://img265.imageshack.us/img265/1940/otherhand.png
Back item http://i31.tinypic.com/10qif5u.png
So in this case, I have a female sprite and a blank space (for my NPC.)
The sprites are there so you know the sizes of things ingame, so that you don't for instance, make the boobs too big. I like to work directly onto the sprite, but you don't have to. There's also no size limits for NPC's, so you can make them as big or as small as you’d like to.
Step 2 - Line art/Outlines

This is a VERY important step, which a lot of you upcoming pixel artists are lacking at. Line art is the most important part of making your sprite. When doing so, you need to consider the perspective you’re viewing it from. Look around on Endless-Online for example, you’ll notice that none of the sprites move directly at the screen, they move from side to side. Therefore, I shouldn’t see any pixels made for Endless be appearing as if they’re directly facing the screen. [many of you do this]
Think of line art as a foundation for when you're building a house. Without a good foundation, though the paint on the house might look great, could come tumbling down, wasting all that time and effort you put into making it. In other words, no matter how good you can color and shade, if you can’t make decent line art, your art is destined to win.
Step 3 - Colouring

Once you have your line art perfected, the next thing you’re going to want to do is figure out the colours that it’s meant to be. If you’re making your pixel based off something already in existence, you’ll probably want to stick to the colors of the original work. If it’s something new and fresh, then try to decide colours that go together. Use the colour wheel if you have to.
Avoid using a complete black colour. This is the colour that Endless-Online’s client identifies as a “background” colour. Meaning that if you use this colour, the area that’s black will become see-through ingame.
**EDITORS NOTE**
My spell checker is nearly ready to explode after spelling it “colour” instead of “color” so many time. ;-;
Step 4.1 - Shading Basics

This is the part where you make your sprites look 3D! Before you go to town on your pixel trying to do some epicly cool shadez, you first need to know where the light source is coming from on EO. The light source on Endless is coming from the top left of the screen. Keep this in mind the whole time you’re shading. The light needs to consistently come from this angle, if it doesn’t, your pixel won’t make any sense, and it won’t go with the rest of the game.
When shading, be sure to vary the colors enough away from each other so they blend well. Colors that are too close to the original color won’t show up well, and that’s not desirablel. Remember, the surfaces of the pixels that directly face the light should be brightest, while the parts that are away from the sun/light source should be dark.
Step 4.2 - Shading Styles
There’s a shading style out there that’s quite common in the new, would-be pixel artists. You should avoid this style at all costs, as it’s not good, and makes your pixel look like crap. This style of course, is called “pillow shading.”
Pillow Shading - Pillow shading is shading in from the outlines, without regard for a light source. This makes your sprite look flat, with a stained-glass appearance, as it's the lines casting shadows, and not the 3D shape. AVOID PILLOW SHADING.

DO NOT EVER PILLOW SHADE. PILLOW SHADE = BAD. YOU PILLOW SHADING = BAD, THEREFORE IF YOU DO IT, YOU = BAD.
AVOID "BANDING" ASWELL
This often goes hand-in-hand with pillow-shading. When adding shadows, avoid following the outlines exactly. This will bring more attention to the inherent jaggedness of the outline, as instead of having one boxy line you have multiple boxy lines I've boxed an example below:

Now that I’ve made that clear, hopefully you won’t do it anymore. There’s also a style out there that you can use that actually blends the colors better. It’s intended to be used so you have to use less colour. [btw, the less colours you use = the better your pixel art will be] This style of course, is called dithering.
Dithering - The process of averaging between pixels of different colors. This results in a smoother, blended transition between the edge of two areas.

This style can also be used to add texture to objects, such as clothing, or things of that nature. If you decide to try and use this style, please use it sparingly. If you over do it, you’ll just end up with a checkered pattern all over the place, and trust me, it doesn’t look good.
And allow me to rehash one more time, DON’T USE PILLOW SHADING, kthx.
Step 4.3 - Outline Shading [optional]

This last part is really at the discretion of the pixel artist, and their preferences. This step can be done elaborately, or sparingly. If you do it sparingly, just make your outline a darker tint of the inside colour. If you’re doing this extensively, you’ll need to color the outline based on how close it is to the light source, etc.
This step is simply intended to make your sprite not have as much of an obvious outline.
Credits:
Drawing and ideas: Lexie
Writing and formatting: Joey
Original Endless-Online sprites: Arvid
Endless-Online: Vult-r
Images used for reference:
[click]
[click]
Website that helped with tutorial:
[click]
*This guide is a work in progress, and things will be added and removed as I see fit*
Mapping Guide
It will be best if you follow through these intructions carefully and not race through. Thank you  .
.
Program(s)
-EO Map Editor 0.2.0 (alpha 7)
{Link: Click Here}
-Winrar
{Link: Click Here}
-Endless-Online GFX (This'll be the game client, overall you will need the GFX)
{Link: Click Here}
File(s) [You will need to create these files].
-EOmap
-EOmaps
[These files don't have to be named above but it is best preffered so you can find your maps]
1. Download the mapping program @ EOserv.net. The link to the website is above.
(Once you have downloaded the program, you will need Winrar. If you do not have Winrar, the link to download it is above).
2. Your program files should open in winrar. (Open Winrar) Your next step is to create a folder anywhere you will be able to access on your computer (example: Desktop), and name it EOmap.
3. Return to Winrar and copy
all the files.

4. Once you have copied the files from the program,
paste it into the EOMap folder you recently created.
5. Now you will need to go to your Endless-Online {Client Link above} folder and copy the GFX (NOT THE FILE) in it. Then go to your EOmap folder and look for gfx. Double click that then paste the gfx inside it.
6. Once you have done those steps, it is recommended to create another easy-to-find folder to store your maps in. (Example names: EOMAPS).
7. Return to the Eomap file itself and look for the
EOmap program. Double click that and
it should open a program.
8. To begin your first map, click file>new. A box should appear.

9. Type in the map name (Usually I would just type in map..)
10. Then type in your width and height (how big) your map will be (Example: width: 25 height: 25)
11. Click on the palette and select a Tile, object etc. Then start mapping
!

If problems persist, do not give me questions, I do not know what has gone wrong, unless you didn't read this guide properly.
Comments please!
Skeleton Maze Guide
Here's a directional guide for the maze that leads to the new Skeleton King map.
Key:
U = Up arrow.
D = Down arrow.
R = Right arrow.
L = Left arrow.
To get to the beginning of the maze, type #warp skeletonking.
From the beginning, follow these directions:
R L U L
L L L L
L L U U
U U R U
U R R R
Follow the wooden sign directly down and walk into the wall. You will then be warped inside a wall.
From standing inside the wall, follow these directions by the number of paces and the direction listed:
2 paces down.
11 paces left.
2 paces down.
2 paces left.
10 paces down.
--
And we're here! Yay!
If you have any questions, please post them.
If you liked the guide, please add a reputation point!
I hope this helped!
Good luck!
Credits:
Me, Otakulove.

![[click]](http://www.nerdfellowship.com/wp-content/uploads/2008/07/pikachu.jpg)